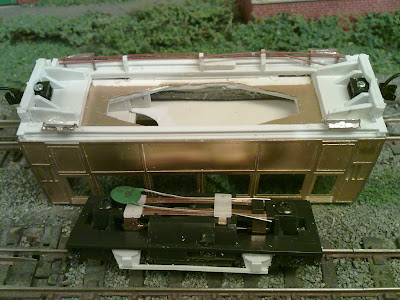
First two layers of 40 thou plastic plus further packing has been added below the floor, which had been set further up the body to get the chassis the right height. The plastic extends slightly below the lower beading as per the photo's I have. Then an underframe was added from plastruct "H" section - allowing for couplings. The very distinctive radiators under the ends were made from plasticard scored with a razor saw, giving the grille effect, then detailed with microstrip strapping, though they have been cut around the coupling.

The Kato chassis has had as much of the "N-gauge" detail removed as possible, but the plastic frames hold the wheels and motor in place so care was taken not to weaken them. Very simple detail was then added for W-irons, axleboxes, and truss-rods, from plastic. Not much of this will be visible! Incedentally the chassis is now a fairly tight fit into the plastic hole left under the body!
Much thought was given to the steps - although the prototype has two steps to each door, I settled on one, as this model has been built lower and on smaller wheels than the prototype. I was also concerned that lower steps might hit platforms, as well as being very vulnerable! The steps were made from off-cuts of the brass etch and soldered to springy wire, which was then bent to suitable supports and glued into holes in the floor behind the solebars. Hopefully this would make them robust enough!

Finally the prototype railcar has some unusual and distinctive rodding (or pipework?) along the side of the chassis, I think these are controls to the driving positions but I'm not sure. Since they are always in shadow, and hard to see clearly on prototype photos, I have made a representation from micro-rod.

This view of the underside of the body, and the chassis removed, shows the basic detail on the chassis as well as the plasticard packing under the body, supports for radiators and details, the brass and wire steps, and how the Microtrains couplers are screwed into place - they can be removed for painting.


1 comment:
It's looking good.
Micro-trains. Brave boy...
Post a Comment